When brewing at home, most home brewers always have a learning process going on. It feels really good to see your fermentation start strongly, with the yeast bubbling away like crazy, but when that foam rises up past the air lock, it means trouble. Likewise, when you have procrastinated your brewing process, or when life gets in the way of making beer, you have to be able to think on your toes to recuperate your brewing investment and ensure that the beer will not become contaminated by rogue yeast, vinegar, or other microorganisms, a.k.a. evil spirits. After all, we brew to raise our spirits, not lower them right? Right.
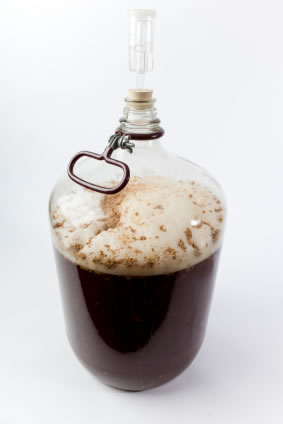
Carboy with airlock |
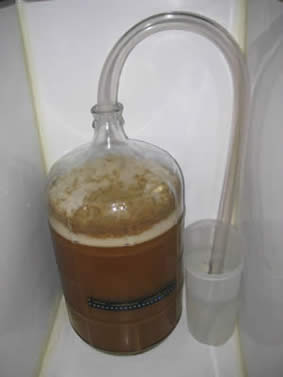
I always like to have extra airlocks and small carboys available when I brew, just in case things get out of control. Sometimes, even after I leave tons of head room, I have had problems with foam coming out of the air lock during high krausen. When this happens, there are a couple of options. Most commonly, you will want to take the cap and innards out of your airlock and shove a plastic hose on the end to make a siphon drain that ends in a glass of sanitizing solution (a mixture of cleaner and water), effectively extending the airlock. Make sure everything is sanitized. Once you have the siphon drain in place, clean and sanitize a new airlock in preparation for re-mounting it.
Once the yeast activity has subsided, you should replace the siphon drain system with an actual airlock. Or, you could just replace the jug at the end of the siphon drain with a cleaned and sanitized jug that is free of beer foam dregs. You still run a risk of contamination, but the idea is to minimize the risk as much as possible.
Carboy with blow off tube assembly |
This kind of siphon drain is often referred to as a blowoff. If you have a lot of unpredictable yeast activity going on, you might want to just install a blow off straight away instead of an airlock. A blowoff is generally considered a good idea, especially if your carboy or fermentation vessel is of the five gallon variety. This will allow the brewing remnants and foam to be pushed out of the fermenting vessel with minimal hassle. If you go this route, a one inch hose is best to deal with the large amount of foam that extrudes from it. This is important, because if the blowoff hose gets clogged, you can have an explosive situation on your hands - literally. [Carboys & Fermentors]
Having overcome that hurdle, our preparations take us to the next phase of brewing, after the fermentation, which is carbonation. If you are like a lot of the home brewers I know - a procrastinator - you will find your beer project is unexpectedly late for the birthday - bachelor - or wedding party that you had intended to bring it to. This is where the technique of force carbonation comes in handy. I have been put in that position more than once and I have found that with a few tricks you can get a beer carbonated in as fast as 30 minutes (with some foaming) or an alternative method that takes 3 to 4 days (if you have the time). The beer will taste a little young, but it will have some fizz and be drinkable.
Force carbonation is a technique that a lot of brewers use to ensure a specific carbonation level for the particular beer project they are brewing. Force carbonation can also be used to carbonate a beer when you do not have enough time to let it carbonate naturally through the natural fermentation process of the beer. For this purpose as well as the former, it is important to control the temperature of the beer. This is because the temperature of the beer has a direct relationship to the amount of CO2 that it is able to absorb - the colder the beer, the more easily it can absorb the CO2.
This quick and dirty force carbonation technique is what I call "Rock N Roll". This process can be done with any sort of kegged beer. I recommend to leave some head room in the keg to help with foaming issues that may be produced by utilizing this technique. Different styles of beer require different amounts of carbonation, so use our Carbonation Chart to find the appropriate levels for the beer you are brewing.
There are a few methods of forced carbonation that you may use when kegging including:
Top Gassing Method: CO2 is forced into a closed keg through the gas line. Pressure works its way through the beer from the top down. It is slow, usually takes many days.
Down-tube Gassing Method - Pressurize closed keg through the serving port (beer out). Use dedicated connector. Agitate keg vigorously.
Carbonation Stone Method - Improves diffusion of gas and speeds dissolution. This method is essential in large brew tanks that can't be picked up. Using a carbonation stone inside of a sealed keg, ultra-fine CO2 bubbles are introduced to the beer from a mounted stone in the down tube or a stone mounted on the underside of the keg lid. Faster and more efficient than top gassing, but more complicated.
I usually choose the down-tube gassing method in time crunch situations. So, once you have your home brew kegged (probably in a soda keg), and cooled down to the ideal serving temperature (probably between 32 and 45 degrees Fahrenheit), hook it up to the CO2 canister and turn the pressure up to the desired PSI according to the carbonation chart. You will hear the CO2 gas entering into the keg and absorbing into the cold beer. This amount of pressure is slightly more than the beer can handle. You will need to lay the keg down on its side with the CO2 on and pressurized, and rock it back and forth.
This manual mixing of the beer and CO2 gas will allow the beer to absorb more and more of the CO2 gas. The key here is to listen to the sound of the gas entering into the keg and mixture. When no more gas can enter into the keg, you know that the beer has absorbed all of the CO2 gas that it possibly can. Now you can unhook the CO2, and leave the keg pressurized for three to four days, and maintain the temperature of the keg at the temperature that it will be served at. When you return to the project, the foaming should have subsided from the mixing process, and you should blow off the extra pressure with the emergency valve on top of the keg. Now, hook up your CO2 tank again and pressurize the keg to the ideal serving temperature.
What I have described is a quick and dirty version of force carbonation. You can try using the pressure recommended to carbonate the beer style you are working on according to our charts to perfect the technique for the specific beer project you are working on.
Carbonation Tools & Charts: [Force Carbonation Calulator] [Force Carbonation Chart]
Christian Lavender is a homebrewer in Austin, TX and founder of Kegerators.com and HomeBrewing.com. |
Related Home Brewing Articles:
Build a Home Brewing Kegerator Fermentation Chamber - Build a kegerator fermentation chamber for the ideal storehouse for fermenting and lagering beers at different temperatures.
Build an Insulated Keg Fermenter - Learn how to build an Insulated Keg Fermenter and get more flocculation temperature control.
How to Bottle Your Homebrew From a Keg - A How To For Bottling Your Homebrew from a Keg using a Beer Gun.