Build a Home Brewing Kegerator Fermentation Chamber

Modifying your kegerator for use as a fermentation chamber is useful and can be an easy task to accomplish. You can make your kegerator an ideal storehouse for lagering beers at different temperatures with the installation of a temperature controller, and optional ventilation holes. In this tutorial we will explore this modification, different mods for different kegerators, and which temperature controllers are well suited to this task.

KEGERATOR FERMENTATION CHAMBER

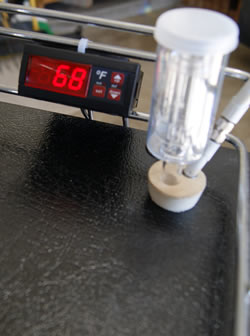
The fermentation chamber below will let you keep your beer's fermentation temperatures stable. This kegerator is modified to let CO2 escape and monitor temperature with a temperature sensor.

Kegerator Fermentation ChamberSource: HomeBrewing.com

If your kegerator is already a freezer conversion, using an inline power flow regulator as a temperature controller (such as the Johnson Controls Manual Thermostat Control Unit), will make your conversion fairly simple. Most freezers have an airtight chamber, so you may want to install a one-way valve that will enable the CO2 produced from the fermentation process to escape. For this mod, you will need to make a one-way vent or air lock and install it somewhere in your freezer's chassis. The door or hatch is usually the best choice for this, as it is free of coolant lines. For more information read this article on Locating Refrigerant Lines.

Tools & Parts

• Power Drill
• 5/32 " Drill Bit
• 5/16" Drill Bit
• 1 1/8" Speedbor Bit
• Thermowell Stopper
• Air Lock
• LOVE Temperature Control Switch TS-13010
• Temperature Sensor (Thermister) with M8 Disconnect Cable

Execution

Now that you have gathered all the necessary parts and tools it's time to get started. There are many different methods of building a fermentation chamber using manufactured or homemade kegerators, but the following method was created with economics in mind. We have included as many pictures as possible during the chamber build to help you along the way. We will be using the Haier Brewmaster Kegerator in this example.

Gather Your Tools

Gather Your Tools

Before I got started on assembly I needed to take inventory of my tools and supplies to make sure I could finish what I started. A quick run to the hardware store left me the proud new owner of a set of Speedbor drill bits, which are perfect for drilling down through the particle board top of the kegerator.

Prepare the Kegerator

Prepare the Kegerator

Not a ton of prep work needed here, but you need to clear the top and inside of the kegerator to make sure you don't hit any thing like the CO2 tank or kegs of beer when drilling.


Drill the Pilot Hole

Drill the Pilot Hole

Using the 5/32 " Drill Bit I started the pilot hole 2 1/4" from the right edge and 2 3/4" from the back edge. You should see the drill bit exit through the inner kegerator lining leaving a small hole in the back right corner.


Hole From the Inside

Hole From the Inside

Place the larger 5/16" drill bit in the drill and repeat the steps to widen the pilot hole. I am drilling in steps with different sized drill bits so as to not split or tear any of the materials in the kegerator top.


Drill the Stopper Hole

Drill the Stopper Hole

Next, ready your Speedbor bit and start drilling down through the particle board top of the kegerator. You have to drill through the plastic top coat and particle board slowly until you reach the insulation layer and then stop. Do not drill all the way through.

Mount the Controller

Mount the Controller

Give your new stopper hole a quick sanding and then slip the thermowell tube and stopper down through the drilled holes until the stopper fits tightly in place. The picture on the left shows the thermowell rod in the back right corner of the kegerator. This location does not get in the way of kegs or CO2 tanks. Next, pop your air lock into the stopper and mount your temperature controller in the location of your choice. We just used a zip tie on the railing of the kegerator. Finally, wire your temperature sensor into your temperature control switch (use the manufacturers directions on this and use caution when doing anything electrical). Slide the thermister probe into the thermowell and you are ready to monitor your ferment temperatures inside the kegerator.

To take the project one step further you can wire your kegerator's power through the temperature control switch allowing the controller to take over the factory installed thermostat. Just crank the kegerator's thermostat to the coldest position and the controller will turn the unit on and off as needed depending on the temperatures you set.

Project by: Christian Lavender is a homebrewer in Austin, TX and founder of Kegerators.com and HomeBrewing.com.

Installing a One-way Gas Vent
The simplest way to install a one-way gas vent is to use a hole saw bit to drill a hole big enough for a rubber stopper and install an airlock. If the freezer is a chest freezer, this can be done in the top of your kegerator hatch. If your kegerator opens out, you can build or re-purpose a small box out of wood or metal and install the same system by drilling through the top of the box, or by fabricating a lightly spring loaded vent system utilizing "Accordion Technology".

To make an exit valve vent using "Accordion Technology", you will need the following:

• a helical torsion spring, or a lightly spring loaded hinge
• some thick felt
• some very thin suede
• screws
• white glue
• and a small piece of thin wood

First, drill a hole into the door of your kegerator using a 1" - 2" paddle bit or hole saw bit. Next, cut your piece of wood to fit over this as a flap. Finish your wooden vent flap and then use the white glue to attach the felt to the wood and then the suede to the flap. While the glue is drying, mount the wooden flap with the hinge and spring or spring-loaded hinge. The spring tension should be enough to hold the flap shut except when pressure causes it to open from the inside.

Dual Chamber Kegerator Conversion
For converting a dual chamber kegerator, you will also need to install a separate temperature controller for the fermentation chamber and for the draught beer holding side of the kegerator. Be Advised! You will need some wiring skills and a basic understanding of working with electrical components in order to make practical use of most of this information. If you don't know what a wire nut is, please do not try this at home.

Materials needed: working refrigerator or kegerator, temperature controller.

Tools needed: wire stripper, wire nuts, wire clippers, electrical tape, drill, possibly a router or jigsaw.

Remember to unplug the kegerator before attempting to install a temperature controller. You will probably want to contact the manufacturer of the refrigerator that your kegerator is based on to get a copy of the wiring diagram of the unit you are working on. A diagram showing what terminals control what should come with your controller.

Some units are more complicated than others. First off, you will want to remove any shelving or icemaker that is built into the kegerator. You may be able to use power and neutral leads that power the icemaker or compartment light to power your new temperature controller. If not, you will have to draw off of power and neutral leads to power the temperature controller by splicing in leads. You will have to look at each kegerator and use process of elimination as well as experimentation to determine which leads need to be plugged in to which terminal on your temperature controller. This will vary greatly depending on which temperature controller and which refrigerator is being installed/modified.

One temperature control unit that works for this conversion is the Love TSS2-2100 Dual Stage Temperature Switch control, which can be used to control both chambers - fermentation and draught - with one unit. This unit can also control a heater, if your kegerator lives in such icy conditions that require the use of one! An important note is that the temperature sensor is not included with this unit.

We recommend that you test your modification thoroughly before brewing your lager. By checking the temperatures in your kegerator and changing the temperature settings on your controller, you can ensure that temperature control will be certain and precise for your fermentations and lagering procedures.

Related Articles:
Building Your Own Fermentation Closet - Keep your beer safe in a climate and light controlled environment and get tips on how to build a fermentation closet.
Secondary Fermentation - Recommendations on secondary and tertiary fermentation for home brewers that want to take the next step in producing quality beers.
Yeast and Fermentation - Learn about the different strains of yeast and the fermentation process for your next homebrew recipe.

Thinking about upgrading your home brewery? Browse our Professional Home Brew Systems.