Build an Insulated Keg Fermenter


When you get a keg of beer from a local keg store, do you return your keg after use? Sometimes we forget to return those beer kegs and they seem to travel with us as we move from place to place. They get buried in the ruins of old artifacts until we unearth them for refilling or a project comes along that calls the keg up for duty. Most of these kegs are your basic 15.5 gallon stainless steel kegs, but what to do with the rubber insulated version?

Keg Fermenter
For extremely flocculant yeast, use a rubber insulated keg for greater temperature stability.

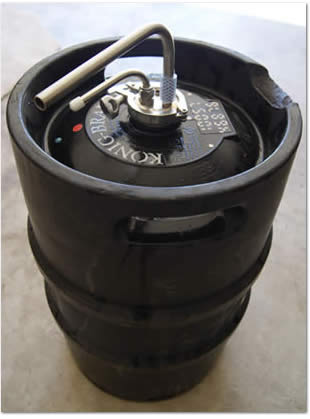
I recently came across one of these rubber insulated kegs back in the depths of my garage and pondered the different ways to take advantage of its insulating power. You could build a mash tun, electric keggle system or a fancy bar stool, but the insulation seemed like a great choice for regulating temperatures during fermentation.

So it was decided. I was going to build a fermenter out of a rubber keg.

I had seen many different keg insulating materials in the past for standard stainless steel kegs like the Keg Coat and Keg Jacket that could be zipped on and off as needed. This keg’s rubber skin was permanent, bonded directly to the stainless steel shell and could not be removed, so I thought the insulating ability must be greater.

Tests needed to be run to prove my theory using a digital temperature monitor on the rubber insulated keg and a keg using a Keg Glove, these kegs were filled with water heated to 85 F degrees and measured until they came to the resting outdoor temperature of 65 F.  As suspected the rubber keg held stable temperatures for a much longer period of time versus a keg with a temporary insulating material.

Knowing that fermentation temperatures are a major factor influencing the degree of flocculation, I thought the rubber keg would be perfect for my current February Texas climate (~65 F). Yeast produces energy, which in turn creates heat. So my thought was that the flocculation activity inside the keg would naturally create additional heat up to a few degrees bringing the fermentation to the target temperature needed and then hold steady.

I scoured the internet for ideas on how to build an efficient system for siphoning and cleaning. I found the dead-sexy Sabco Brew-Magic Fermenter with a large 4” Tri-Clamp port for easy cleaning and access. This keg fermenter has all the bells and whistles, which is why it costs upwards of $600. I had to keep searching. Finally, I came upon an American Sanke Keg Fermenter Kit with Thermowell.

This kit was affordable (under $80) and exactly what I needed. The kit used the keg’s existing Sanke valve port with a tri-clover clamp assembly which was TIG welded with a racking tube, blow off port and thermowell. The only drawback on this design was that the valve opening was small and hard to get into the keg for cleaning. I was able to boil some water in my Hot Liquor Tank (HLT) and transfer the boil over to the fermenter to soak. Then hit it with the Powdered Brewery Wash (PBW) and a carboy scrub brush. Using a small pump, some PBW and a little PVC pipe, all of my cleaning fears disappeared after my first run.

Parts and equipment list

• 15.5 Gallon Rubber Insulated Keg
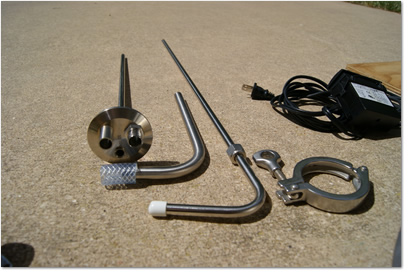
• Fermenter Cap with compression nut
• Racking Cane with sanitation cap
• Blow-off tube with vinyl tubing to attach it to the Cap
• Tri-Clover Clamp
• Cap O-Ring
• Racking Cane O-Rings
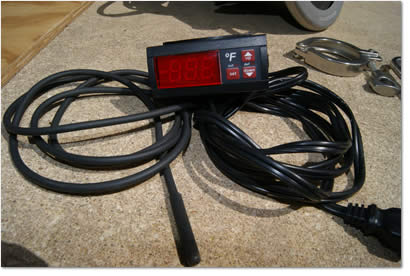
• LOVE Temperature Control Switch TS-13010

• Temperature Sensor (Thermister)
• Flat head screwdriver
• Nail
• Measuring tape
• Skill Saw
• Plywood (14” x 14”)
• Ratchet Tie-Down
• 3 – 1-1/4 in. Caster Rubber Wheels
• 12 – Wood Screws
POP THE TOP

1. POP THE TOP
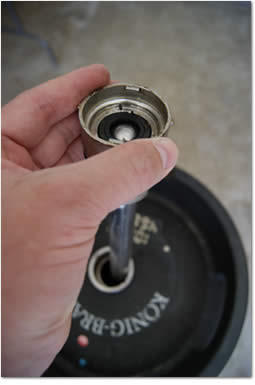
Using a keg coupler or pump, de-gas the keg and let out all the pressurized air that may be inside the keg. (Brewer's Note: Using a screwdriver to push down the steel ball valve to depressurize the keg can result in a face full of old beer and is not recommended.) Next remove the ring clip by placing the tip of a small nail into the groove on the outside of the ring clip (retainer ring) and press down until the clip pops out. Grab the ring with a pair of pliers, so you don't cut your fingers on any sharp edges of the clip. Tapping the keg spear using a flathead screwdriver, gently tap the barbs counterclockwise with a hammer. The Sanke spear should twist as you tap. Finally, remove the keg spear by grabbing the spear and lifting it out of the keg. Save the spear. You may be able to incorporate the stainless steel tube into your brewery either as a siphon or as another piece of plumbing on another project.


ASSEMBLE THE KIT

2. ASSEMBLE THE KIT
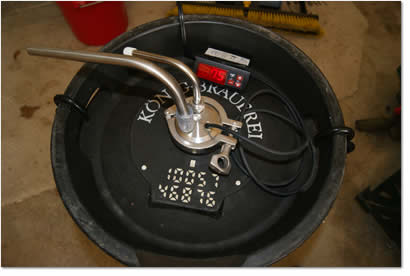
Lay out the parts included with the kit. Place the large silicone o-ring over the thermowell and racking cane and press it into the groove on the fermenter cap. Hold the o-ring in position as you thread the racking cane and thermowell into the rubber keg. Set it in place. Make sure the o-ring doesn't slide out of position and then use the clamp to lock the cap onto the fermenter. Loosen the compression nut and slide the racking cane in as far as it will go. Using the included piece of 1/2" tubing, you can either attach the stainless steel blow off tube or you may choose to just install a 3-piece type airlock. I was anticipating a vigorous fermentation, so I chose the blow-off tube.

CLEAN & SANITIZE

3. CLEAN & SANITIZE
Before you get started with your first fermentation, make sure to clean all of the parts. Cleaning the Sanke keg fermenter is best done using PBW, Oxyclean or an equivalent cleaner and hot water. The easiest way to do this is to mix a few gallons of cleaner in your HLT and fire on the burner. Be sure the opening is not obstructed and bring the solution to a boil. Shut off the flame and transfer the solution into your fermenter via a pump and allow the fermenter to cool down. Once it is cool, you can roll the keg on the ground and/or us a carboy brush to reach the inside of the top. The steam will have loosened the kreusen ring and the PBW solution should take care of the rest. Rinse your fermenter well and turn it upside down to drain.


WIRE THE TEMPERATURE SENSOR

4. WIRE THE SENSOR
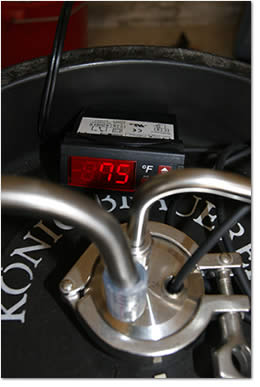
I used the LOVE Temperature Control Switch TS-13010 for temperature monitoring on this fermenter. The switch came with a Temperature Sensor (Thermister), but it did not come with a cord for power. A quick call to my brother, the electrical genius, had me ripping an old cord out of a printer and wiring it into the switch. The Temperature Sensor (Thermister) easily wired into the back of the unit and I had a functional temperature monitor. To take the project one step further you could wire a refrigerator’s power through the temperature control switch allowing the controller to take over the factory installed thermostat. Just crank the thermostat on the fermentation refrigerator to the coldest position and the controller will turn the unit on and off as needed depending on the fermentation temperatures you set.

STABILITY & MOBILITY

5. STABILITY & MOBILITY
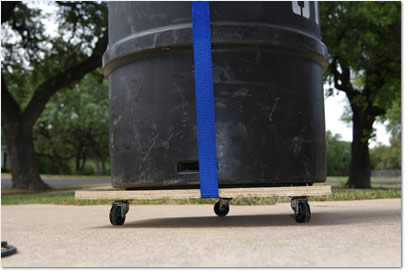
Once the fermenter kit was installed I needed a way move the keg around easily and with good stability. The last thing I needed was for the fermenter to spill over and face plant while I was wheeling it across the floor. I grabbed a few small rubber caster wheels, wood screws and some plywood. I placed the keg on the plywood and made a trace of its circumference, measured its diameter and cut a square of plywood equal to that measurement. I measured an equilateral triangle in the center of the plywood and mounted the casters at each point of the triangle giving me equal weight distribution across the three wheels. I used a Ratchet Tie-Down belt in order to secure the keg to the keg dolly. Cheap and dirty, but it worked.

Test Drive

6. TEST DRIVE
Time to get some beer bubbling. I brewed up 10 gallons of Tasty APA for a trial run in the new fermenter. After running the wort out of the boil kettle, through the pump and oxygenation system, trub filter and plate chiller, the beer made its way to the keg. I pitched the yeast and gave everything one last quick spray with sanitizer and then set the fermenter cap assembly in place. After 24 hours I checked back on the progress and I had an extremely active fermentation going on which was noticeable by the massive amount of activity coming from the blow off tube. The keg was not under pressure, but I would advise never to stand directly over the fermenter assembly.

From this build I learned that deeper, taller fermenters create more pressure in the wort, reducing ester production and attenuation. So, fermenting in a keg versus a carboy allows different head space which can really change the yeast profile and hop characteristics of your beer for the better.

Christian Lavender is a homebrewer in Austin, TX and founder of Kegerators.com and HomeBrewing.com.

Related Projects :
Build a Home Brewing Kegerator Fermentation Chamber -- Build a kegerator fermentation chamber for the ideal storehouse for fermenting and lagering beers at different temperatures.
Building Your Own Fermentation Closet -- Keep your beer safe in a climate and light controlled environment and get tips on how to build a fermentation closet.
Secondary Fermentation -- Recommendations on secondary and tertiary fermentation for home brewers that want to take the next step in producing quality beers.